
Share with:
Whirlpool In-Door Ice System Troubleshooting Guide
For general information visit the “How Ice Makers Work
 So your ice maker’s slacking off again and your looking for some payback…well you’ve come to the right place. On this page you will learn how to whip that lazy ice maker back into shape and have it pumping out cubes faster than a kid in a Rubik tournament!
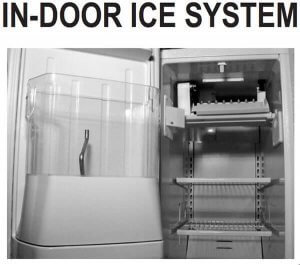
The Whirlpool & Kitchen Aid in-door ice system is very nice design because it frees up a large amount of space in the freezer compartment and makes important job of dumping old ice much more convenient. Mechanically, this is a Whirlpool modular ice maker with a few extra trim pieces, different fill tube location, and a set of control boards have replaced the bail arm switch.
One other important note… Whirlpool redesigned the optics portion of this system around 2002 so there are two different diagnostic methods depending on which set of boards are installed in your refrigerator, pre or post 2002 ice maker models.
Common Problem Links | Pre Op | Pre 2002 Diagnostic Tests
Post 2002 Diagnostic Tests | Ice Maker Removal | Ice Maker Test Points | Dispenser Parts | Dispenser Strip Circuits
Common Problems:
“My Icemaker is not producing Ice.”
“I can’t get any ice to come out of the dispenser.”
“There is a bunch of frost in the dispenser shoot and ice bin.”
“The bottom of my freezer is covered with ice.”
“There are little flakes of stuff in my ice.”
“The Ice bin is one big clump of ice.”
Pre-Op:
First thing is first! Lets not make more work for ourselves than we have to.
“Work smarter not harder.”
–some smart guy-
Is the on of switch, located on the right side ice maker control slid to the on position? An invisible beam of infrared light is sent across the top of the ice bin to detect if the bin is full of ice. The on/off switch is a slide that will block the beam and stop ice production.
Is the ice bin full? Hmmm.
Could there be grime or frost on ether the emitter or receiver board windows that may block the light beam’s round trip?
Whirlpool & Kitchen Aid In-Door Ice System Technical Manual PDF
Ice Maker Optics Diagnostics
Pre 2002 Diagnostic Tests:
Note: The ice bin must be installed on the door to activate the left side flap, ice should not be over the top notches of the bin. If you don’t get any response from the diagnostic test… wait 5 minutes then unplug the refrigerator for 10 seconds to reset the ice maker control board and try again.
Step 1. Open the freezer door (make sure that the freezer door has been closed for a minimum of 10 seconds prior to opening the door).
Step 2. Activate the door switch 3 times. Push the button in completely for 1 second each time.
Step 3. Close the freezer door for a minimum of 5 seconds for a maximum of 50 seconds.
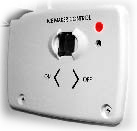 Step 4. Open the freezer door and immediately view the diagnostics red status light next to the ice maker’s on/off switch.
Results:
-Two flashes repeated once means the ice maker’s optics are blocked or defective.
-A steady on light for 5 seconds means the ice maker’s optics boards are working properly.
-If there is no light try resetting the optics boards as in the note at the top of this section. If there is still no light you may need a new set of optics boards, or the LED light is out.
Boards purchased from this link have a 1 Year Return Policy! No questions asked, installed or not!
Post 2002 Diagnostic Tests:
Note: The ice bin must be installed on the door to activate the left side flap, ice should not be over the top notches of the bin. If you don’t get any response from the diagnostic test… wait 5 minutes then unplug the refrigerator for 10 seconds to reset the ice maker control board and try again.
Step 1. Open the freezer door and observe the red status light next to the ice maker’s on/off switch.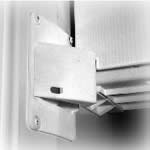
Result:
You should see two flashes and a one second delay repeating. If there is no light your LED light may be out, you may have pre 2002 boards installed, or the optics boards need to be replaced.
Step 2. Close the left side flapper door and make sure you are not blocking the optics board’s light path.
Result:
The red status light should be steady on. If the light continues to flash, your optics are either blocked in some way or they need to be replaced.
Boards purchased from this link have a 1-year warranty, no questions asked, installed or not!
Ice Maker Removal:
This style of icemaker is mounted sideways at the top of the freezer compartment and is covered by a door flap. There is also a spring-loaded flap on the left side of the freezer that will open and block the emitter board whenever the freezer door is opened. This will break power to the ice maker whenever the door is opened and keep you from getting showered with freshly produced ice cubes when you’re grabbing some tasty treat.
Step 1. Unplug the refrigerator…Safety First! (Note: some tests may require electrical current. Proceed with caution and at your own risk.)
Step 2. Remove the ice maker cover by applying sideways pressure and pulling slightly.
Step 3. Remove one ¼” screw from that right bottom of the ice maker that secures the wire harness cover. Then remove the cover by pulling it toward the back of the freezer.
 Step 4. Locate two plastic tabs on the bottom of the ice maker mounting bracket. Apply pressure to both tabs while pulling the ice maker forward. You will feel some resistance from the water fill tube at the top of the ice maker, but fear not it’s flexible and will give.
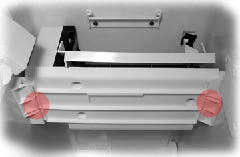
Step5. Unplug the wire harness. You now have an ice maker in your hands… Now what? Take a look at “Ice Maker Test Points” for more testing help.
Ice Maker Parts:
The Whirlpool in-door ice system uses ice maker part#2198597 and part#W10190961 for 22cf. models
The Whirlpool modular ice maker mechanics are examined in detail at this link “Whirlpool modular icemaker” Note: the in-door ice system ice maker differs from the ice maker described in this video in the following ways: There are several additional trim pieces that direct air flow and direct ice into the door bin as it harvests. It also has a slightly different fill cup for top fill vs. rear fill.
In that note the water supply tube which supplies water to the 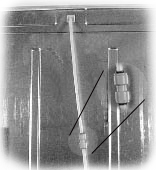 ice maker from the freezer ceiling can be removed and cleared by following the steps below…
Step 1. Remove the ice maker.
Step 2. Disconnect the water supply tub from the back of the refrigerator at the “John Guest” disconnect fitting. (To release the tubing from the fitting press the tubing into the fitting while pressing and holding a small ring into the fitting. This will allow you to pull the tubing free from the fitting.)
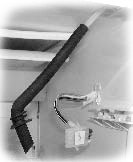 Step 3. Pull the tubing out from the inside of the freezer compartment. After you have cleared the ice maker supply tube of any blockages reinstall the tubing by feeding it back through the hole in the ceiling of the freezer and reconnect to the John Guest fitting behind the refrigerator. (To reconnect the tubing press the tube back into the fitting and give it a little pull to seal. Always triple check the connection for signs of leaking. It may take a few days for a leak to show itself because of the intermittent ice maker fill cycle.)
Dispenser Parts:
What if your ice maker is pumping out ice like a lover scorned but the dispenser just won’t put out…
There are quite a few elements that deliver ice from the bin to your glass so here is an overview of the process and the components involved.
When you press the paddle of your dispenser a mechanism opens the ice shoot door and a switch is closed that should energize a motor in the freezer door. When the motor is activated it turns a drive shaft that connects to the bottom of your ice bin. This causes the wavy arm in your ice maker bin to turn and push ice down through the open shoot for your icy refreshment…
Common Problems With The In-Door Ice Dispensing System:
“I can’t get any ice to come out of the dispenser.”
“I don’t hear the motor at all.”
Is the dispenser lock button on? Does your freezer light switch work? You may have a power supply problem in the dispenser switch pack or the motor has completely given up. 
(Shock Hazard! Voltage must be present for these tests.)You can check the motor for voltage by removing the motor cover at the bottom of that big blank bulge in your freezer door. (Double check your wire diagram for test points and wire colors.) Your freezer door switch needs to be taped closed so that power is supplied to the circuit. Then with the motor plugged in check for 115 ACV from the two center contacts. (Usually blue and white) when the ice dispenser paddle is depressed. Next check for VDC 115 across the two right most connections and the two left most connections (Orange/Blue to Pink/Black) and (Red/White to Brown/White) when the ice dispenser paddle is depressed, on both crushed and cubed settings.
Take a look at the dispenser strip circuits below.
“The motor just makes a humming noise.”
Remove the ice bin and also remove the bracket that holds the drive coupling from the motor into place. Now pull the drive shaft up and out, close the door and try it again if the motor is still just humming you probably need to replace the dispensing motor. If that fixed it, check that the arm in the ice bin moves freely and look for anything that might cause the shaft to bind up.
“There is a bunch of frost in the dispenser shoot and ice bin.”
Frost in the ice shoot or bin almost always is a sign of an air leak. After all it’s an ice maker not a frost machine. You can check for air leaks by removing the ice bin and shining a flashlight down into the ice shoot, then look for light from the outside of the dispenser shoot. You may also see a cylinder looking device attached to the dispenser door. This is a suction tube that has a plunger inside that slows the closing of the door for quiet operation. If the door is not closing all the way you may try removing this device and scratching a line or two on the inside of the cylinder. This will allow the door to close more quickly, for a slightly stronger seal there will also be slightly more noise as the door is closing.(Tip: If you are going to attempt to repair or replace the ice dispenser door or dispenser switch move slow take pictures and don’t remove more parts than you must.)
“The Ice bin is one big clump of ice.”
This is actually fairly normal and the ice bin should be emptied of old ice on a regular basis to prevent damage to the ice bin. However, if the ice is freezing together very quickly (less than a week or two) you may have an air leak at the ice shoot door. You can check for air leaks by removing the ice bin and shining a flashlight down into the ice shoot, then look for light from the outside of the dispenser shoot. You may also see a cylinder looking device attached to the dispenser door. This is a suction tube that has a plunger inside that slows the closing of the door for quiet operation. If the door is not closing all the way you may try removing this device and scratching a line or two on the inside of the cylinder. This will allow the door to close more quickly, for a slightly stronger seal there will also be slightly more noise as the door is losing.(Tip: If you are going to attempt to repair or replace the ice dispenser door or dispenser switch move slow take pictures and don’t remove more parts than you must.)
Share with:

My 2014 ice maker in door side by side Whirlpool won’t dispense, the door opens but no ice “cube” drops nor crushed as agitator doesn’t turn. The bin is not froze up. When pressing switch, the ice door opens but agitator doesn’t turn even with empty bin